Data Sheet 12: Cylinder Force for Punching, Notching and Shearing
 | Table of Materials – See handbook for othersSheet MaterialShear Str. Range, PSIMultiplierAluminum8,000 to 34,000.13 to .57Brass, half-hard28,000 to 48,000.47 to .80Dural22,000 to 83,000.37 to 1.4Copper, rolled22,000 to 29,000.37 to .48Steel, low carbon45,000 to 75,000.75 to 1.3Steel, medium carbon60,000 to 135,0001.0 to 2.3Steel, High Carbon65,000 to 160,0001.1 to 2.7Stainless steel, 18-865,000 to 95,0001.1 to 1.6 |
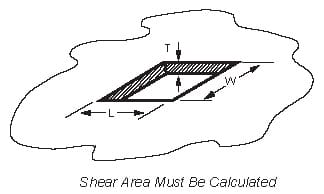
An approximation can be made of the cylinder force needed to punch a hole, slot, or notch, using this method: Find the cross section, in square inches, of the section to be sheared. In the illustration it would be the distance around the hole (perimeter) multiplied by metal thickness.
Square inches to be sheared= (L + W + L + W) x T
(All dimensions to be in inches)
Next, find the shear strength rating of the material. For approximation, the values in the table under the illustration may be used. Shear strength may vary widely according to how extensively the material has been work hardened. For more accurate results, the shear rating should be obtained from the metal supplier. Shear strength of other materials may be found in a mechanical handbook. For metals (only), shear strength is about 75% of tensile strength. Mechanical shear strength is expressed in PSI (lbs. per square inch).
Finally, multiply the number of square inches to be sheared times the shear strength rating of the material. The answer will be cylinder force needed to make the cut, assuming the punch is flat and shears the entire cut area simultaneously. To reduce the force, die makers sometimes bevel the punch so it enters the shear area gradually, although this may distort the material or the slug. Where several holes are to be punched, the punch heights may be staggered to reduce the maximum force required.
Example of Shearing Force Calculation
Find the cylinder force needed to shear a rectangular hole measuring 1/2 x 5/8″ in a sheet of steel which has a thickness of 3/16″ and a shear strength of 60,000 PSI.
Solution: Convert fractional dimensions to decimals:
Hole measurements= .500 x .625 x .1875″ thick.
Area to be sheared: (.500 + .625 + .500 + .625) x .1875 = .422 square inches.
Shearing force = 60,000 x .422 = 25,300 lbs., or 12.65 tons.
Tonnage Required for Punching Round Holes
Figures in the body of this chart are U.S. tons (2000 lbs) required to punch round holes in mild carbon steel having a shear strength of 60,000 PSI, subject to the multiplier (from table above) of .75 to 1.3, according to the state of the metal, whether annealed or work hardened. For other materials, use these values times the multiplier from the table above.
| Gauge No. | Thickness Inches | 1/8 | 3/16 | 1/4 | 5/16 | 3/8 | 7/16 | 1/2 | 9/16 | 5/8 | 11/16 | 3/4 | 13/16 | 7/8 | 15/16 | 1 |
| Hole Diameters in Inches | ||||||||||||||||
| 20 | .0359 | 0.423 | 0.634 | 0.846 | 1.06 | 1.27 | 1.48 | 1.69 | 1.90 | 2.11 | 2.33 | 2.54 | 2.75 | 2.96 | 3.17 | 3.38 |
| 18 | .0478 | 0.563 | 0.884 | 1.13 | 1.41 | 1.69 | 1.97 | 2.25 | 2.53 | 2.82 | 3.10 | 3.38 | 3.66 | 3.94 | 4.22 | 4.51 |
| 16 | .0598 | 0.705 | 1.06 | 1.41 | 1.76 | 2.11 | 2.47 | 2.82 | 3.17 | 3.52 | 3.87 | 4.23 | 4.58 | 4.93 | 5.28 | 5.64 |
| 14 | .0747 | 0.880 | 1.32 | 1.76 | 2.20 | 2.64 | 3.08 | 3.52 | 3.96 | 4.40 | 4.84 | 5.28 | 5.72 | 6.16 | 6.60 | 7.04 |
| 12 | .1046 | 1.23 | 1.85 | 2.46 | 3.08 | 3.70 | 4.31 | 4.93 | 5.55 | 6.16 | 6.78 | 7.39 | 8.01 | 8.63 | 9.24 | 9.86 |
| 11 | .1196 | 1.41 | 2.11 | 2.82 | 3.52 | 4.23 | 4.93 | 5.64 | 6.34 | 7.05 | 7.75 | 8.45 | 9.16 | 9.86 | 10.6 | 11.3 |
| 10 | .1345 | – – – – | 2.38 | 3.17 | 3.96 | 4.75 | 5.55 | 6.34 | 7.13 | 7.92 | 8.71 | 9.51 | 10.3 | 11.1 | 11.9 | 12.7 |
| 3/16 | .1875 | – – – – | 3.31 | 4.42 | 5.52 | 6.63 | 7.73 | 8.84 | 9.94 | 11.0 | 12.1 | 13.3 | 14.4 | 15.5 | 16.6 | 17.7 |
| 1/4 | .2500 | – – – – | – – – – | 5.89 | 7.36 | 8.84 | 10.3 | 11.8 | 13.3 | 14.7 | 16.2 | 17.7 | 19.1 | 20.6 | 22.1 | 23.6 |
| 5/16 | .3125 | – – – – | – – – – | – – – – | 9.20 | 11.0 | 12.9 | 14.7 | 16.6 | 18.4 | 20.2 | 22.1 | 23.9 | 25.8 | 27.6 | 29.5 |
| 3/8 | .3750 | – – – – | – – – – | – – – – | – – – – | 13.3 | 15.5 | 17.7 | 19.9 | 22.1 | 24.3 | 26.5 | 28.7 | 30.9 | 33.1 | 35.3 |
| 1/2 | .5000 | – – – – | – – – – | – – – – | – – – – | – – – – | 20.6 | 23.6 | 26.5 | 29.5 | 32.4 | 35.3 | 38.3 | 41.2 | 44.2 | 47.1 |
| 5/8 | .6250 | – – – – | – – – – | – – – – | – – – – | – – – – | – – – – | – – – – | – – – – | 36.8 | 40.5 | 44.2 | 47.9 | 51.5 | 55.2 | 58.9 |
| 3/4 | .7500 | – – – – | – – – – | – – – – | – – – – | – – – – | – – – – | – – – – | – – – – | – – – – | 48.6 | 53.0 | 57.4 | 61.9 | 66.3 | 70.7 |
| 7/8 | .8750 | – – – – | – – – – | – – – – | – – – – | – – – – | – – – – | – – – – | – – – – | – – – – | – – – – | 61.9 | 67..0 | 72.2 | 77.3 | 82.5 |
| 1 | 1.000 | – – – – | – – – – | – – – – | – – – – | – – – – | – – – – | – – – – | – – – – | – – – – | – – – – | – – – – | 76.6 | 82.5 | 88.4 | 94.2 |
Example of Force to Punch a Round Hole
Find cylinder force to punch a 3/4″ diameter hole in a 1/8″ sheet of brass.
Solution: Use the table at the bottom of the opposite side of this sheet which shows that 8.45 tons would be required in a .1196 sheet of steel. Brass has a multiplier of .47 to .80 (from upper table). Maximum force for brass would be 8.45 x .80 = 6.76 tons. Probably less force would be required unless the brass were in an extremely hard state.

Cylinder Force to Overcome Load Friction
The total load which a cylinder has to move may consist of 3 or 4 components, each of which may have to be considered when choosing the cylinder bore and PSI.
(1). Force exerted on the load to bend it, compress it, for it, shear it, etc., is useful energy flowing from the cylinder into the load, and is calculated in the usual manner.
(2). Force exerted on the load to move it against frictional drag is the subject of this data sheet.
(3). Force required to overcome inertia in getting the load started and accelerated to final velocity was the subject of Data Sheet No. 4.
(4). Up-acting cylinders must supply an additional force equal to the weight of the load. This will be the subject of a future data sheet.
Force to Overcome Load Friction
 | Figure 1. High friction loads are those of machine slides; lathe tailstocks or turrets, planers, milling machine or grinder tables, etc.These are applications for hydraulics, not air. An attempt to use an air cylinder, especially on slow feed, against a high friction load may result in erratic motion, although for rapid positioning, an air cylinder may work quite well. |
Friction depends on many factors including load weight, surface materials, speed of motion, area of contact, degree of lubrication, etc. Breakaway friction (starting from a standstill) is greater than running friction.
In this limited discussion we will consider only the case which is most common to fluid power applications – breakaway friction of iron on steel on moderately lubricated surfaces. Machinery’s Handbook gives a coefficient of friction of 0.21 under these conditions.
Cylinder force for breakaway in a horizontal direction is load weight times coefficient of friction. In Figure 1, a force of 1000 x 0.21 = 210 lbs. is required to slide the load horizontally, although 1000 lbs. is required to lift it.
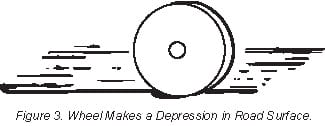
 | Figure 2. Rolling friction loads are those of wheels running on rails or road surfaces, as overhead cranes, road machinery, service vehicles, etc., and are more related to hydraulic motor drive than to cylinders. Although wheel bearings cause some friction, most of the resistance is caused by the wheel trying to roll up out of the depression which it made in the supporting surface. |
 | Figure 3. Force, in lbs., to overcome rolling resistance= .02 x W x R, in which W is load on wheel, in lbs., R is radius of wheel, in inches, and .02 is a coefficient applicable to iron on iron. If the load is supported on good anti-friction bearings, bearing friction should not be greater than 1 to 3% of load weight.Rolling resistance of road vehicles is from 5 to 25% of load weight depending on road surface. |
An empirical value which has been used in calculating the horizontal force for railroad trains is 3 to 4% of the total weight. A 2400 ton train would require a forward force of 200,000 lbs.
Various authorities differ on the true values of rolling resistance so information given here should only be used for approximate calculations.
© 1989 by Womack Machine Supply Co. This company assumes no liability for errors in data nor in safe and/or satisfactory operation of equipment designed from this information.